Frist of all I made a master pattern I always use a plastic painting floor cover for making my patterns, it is surdy , see through and last forever.
measure and cut your pattern 19" x 12"'
Then gather all you materials, fabrics, button (I will decide which button I will use at the end so this is why I have several choosen), a hair elastic band, I used a hunter green one to good with the fabrics, and you will also need some thin batting, I used Warm and Natural brand of batting for this project.
Then I cut out the center band 13: x 2", and the ruffles cut two strips 27" x 2".
Now cut out the top and the lining and batting using the 19 x 12 master pattern.
How to make the center band and Ruffles:
1. For Center band: Fold the fabric in half, then open and fold in each edge to the center of the fold.
2.Turn over to the front and press well.
3. Measure down 5 inches from edge and pin band in place.
4. Gather the ruffle strips and pin then to the top and bottom of center band to fit.
5.Leave ends of ruffles ungathered so they lay flat on the seams. I tucked in my ruffles under the centerband so the gathering threads do not show, use lots of pins so your gathers stay flat and look pretty. Sew the centerband in place with a narrow seam that catches the ruffles.
6.Sewing the lining: Stitch the Warm and Natural batting to the edges of the lining fabric and then quilt it so it doesn't shift around. I just did a few stitches going down and then going the the other way...you decide how you want to quilt yours. I also did a zig zag stitch on the edges so it then will work as 1 piece of fabric. I find this is the easiest way to work with two piece of fabric together.
Trim the edges to clean it up and make it all pretty.
7. Attaching the Hair elastic: I first choose which button I was going to use , in this case I am using a large green button, so I measure the elastic to be sure to fit around the button and I gave it a liitle bit more room so it will go around the Ipad and then fit around the button, I then did a simple knot in the elastic. I measured in 1/4" from the seam measured where the button will go and marked that stop to the lining fabirc with a pin. I sewed this elastic in place, do this really well because tis is a stress place where you will open and cose your cover over and over again and you don't want the elastic to come undone.
8.Fold the top and the lining in half, and sew down leaving the top open for now.
9.turn the top right side out, and insert into the lining piece. Pin in place making sure the elastic band is on the opposite place to where the button is.
11. Turn inside out and press open seam closed. I used a 1'2" seam for this, I also stitched over the elastic band a few times to make sure it was strong enough to be used over and over again.
12. sew a top edge...and you are done!...Good for you , you made a Ipad cover.
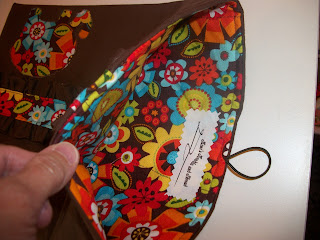
This is the inside of my Ipad cover.
I have no control as to what you do with this pattern and instructions, but they are mine, and I will hope you will use intergrity when using my ideas and instructons, you may make as much of these and sell them in any online shop or craft show..but please do not use my tutorial and say it is your own...I worked hard on this, and would like to be given credit for my work. Thank you for following this tutorial, if you have questions, I will try and answer them and please give me feedback as to how you like this tutorial, I am new at this and still learning. God Bless. Mimi


No comments:
Post a Comment