Saturday, November 24, 2012

Pin Up Girl Shower Cap; How did I think of that!

Retro Pin Up Girl Shower Caps for the Modern Gal
I had so much fun making these. While looking through old Pin up girl pictures I came across a picture of an old poster of a cute girl wearing a sassy shower cap, I knew I had to have one. So I made one and then I made another, and another and now I am bringing them out for all to see and enjoy.

These shower caps are so great to wear. They fit any size head or hair length. The elastic is snug enough to keep your hair dry in the shower without pinching your head and hurting you. The outside is made using designer fabrics which are bright and colorful. The inside is made using a shower curtain vinyl, which is mold resistant and completely waterproof.

Next, to order yours as a gift for yourself or a friend go to https://www.etsy.com/listing/114227511/retro-pin-up-girl-handmade-shower-cap
or go to my fanpage to see these more clearly or to check out my other creations:
Mimi's Needle and Thread!

Friday, April 27, 2012

Make a ruffled Ipad pouch.

I saw this picture of a really cute Ipad pouch and I knew I wanted to make one. So I set out to create a pattern for it, and then decided to share with you how to make one for yourself.

Frist of all I made a master pattern I always use a plastic painting floor cover for making my patterns, it is surdy , see through and last forever.

measure and cut your pattern 19" x 12"'
Then gather all you materials, fabrics, button (I will decide which button I will use at the end so this is why I have several choosen), a hair elastic band, I used a hunter green one to good with the fabrics, and you will also need some thin batting, I used Warm and Natural brand of batting for this project.
Then I cut out the center band 13: x 2", and the ruffles cut two strips 27" x 2".
Now cut out the top and the lining and batting using the 19 x 12 master pattern.

How to make the center band and Ruffles:
1. For Center band: Fold the fabric in half, then open and fold in each edge to the center of the fold.


2.Turn over to the front and press well.

3. Measure down 5 inches from edge and pin band in place.
4. Gather the ruffle strips and pin then to the top and bottom of center band to fit.

5.Leave ends of ruffles ungathered so they lay flat on the seams. I tucked in my ruffles under the centerband so the gathering threads do not show, use lots of pins so your gathers stay flat and look pretty. Sew the centerband in place with a narrow seam that catches the ruffles.

I also sewed down the ends where the seams will be.

6.Sewing the lining: Stitch the Warm and Natural batting to the edges of the lining fabric and then quilt it so it doesn't shift around. I just did a few stitches going down and then going the the other way...you decide  how you want to quilt yours. I also did a zig zag stitch on the edges so it then will work as 1 piece of fabric. I find this is the easiest way to work with two piece of fabric together.

Trim the edges to clean it up and make it all pretty.

7. Attaching the Hair elastic: I first choose which button I was going to use , in this case I am using a large green button, so I measure the elastic to be sure to fit around the button and I gave it a liitle bit more room so it will go around the Ipad and then fit around the button, I then did a simple knot in the elastic. I measured in 1/4" from the seam measured where the button will go and marked that stop to the lining fabirc with a pin. I sewed this elastic in place, do this really well because tis is a stress place where you will open and cose your cover over and over again and you don't want the elastic to come undone.

8.Fold the top and the lining in half, and sew down leaving the top open for now.

9.turn the top right side out, and insert into the lining piece. Pin in place making sure the elastic band is on the opposite place to where the button is.

10.Pin in place leaving a 2" space unstitched. You will need this for turning inside out

11. Turn inside out and press open seam closed. I used a 1'2" seam for this, I also stitched over the elastic band a few times to make sure it was strong enough to be used over and over again.

12. sew a top edge...and you are done!...Good for you , you made a Ipad cover.
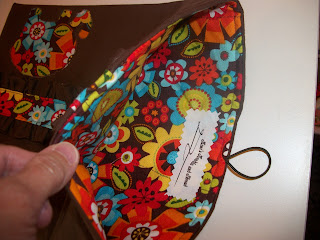
This is the inside of my Ipad cover.
I have no control as to what you do with this pattern and instructions, but they are mine, and I will hope you will use intergrity when using my ideas and instructons, you may make as much of these and  sell them in any online shop or craft show..but please do not use my tutorial and say it is your own...I worked hard on this, and would like to be given credit for my work. Thank you for following this tutorial, if you have questions, I will try and answer them and please give me feedback as to how you like this tutorial, I am new at this and still learning. God Bless. Mimi


Thursday, April 26, 2012

Mimi's in the kitchen....

I love to cook and I love to bake...but since my husband was diagnosed with Diabetes, I have had to be careful with what I feed him. So I have been on a quest to find low-fat and low sugar meals and desserts we could both eat and enjoy. While on my quest I have come upon different blogs, articles and places where I have picked up many different and yummy recipes, one such recipe is The low-fat Lemon Pound cake.
This is so delicious no one will ever guess this is low-fat or low in sugar,
Click on this link to view the recipe:
http://www.americastestkitchenfeed.com/recipes/low-fat-lemon-pound-cake/
Cooking for a person with Diabetes has sometimes proven to be a challenge but when you love someone you want to give the best you can , and you want to make them happy. And cooking in this new way has proven a great thing for the both of us, we have both lost some weight and feel healthier for it. So enjoy this cake, and Bon Apetit!

Spring means...flowers, flowers, flowers

Flowers can add so much to any sewing project, I love adding them to my aprons as well as to the Tote bags that I make. I recently found a blog that teaches us how to make them with pictures and tutorials.
Click on link to view tutorial
:http://threepumpkinslittle.squarespace.com/blog/2010/2/11/fabric-flower-embellishment-tutorial.html


 I have made several of these flowers to add to some of my aprons .

and on a tote bag I recently made.


Check out this blog and try one or two of the many different flowers you can create, using fabric, faux leather, and even plastic bags.

Thursday, April 19, 2012

what's cooking at Mimi's


Last summer my granddaughter and I decided we would make Blueberry pie for the family so we gatheresd all the ingredients and set to work.

Here is the recipe we used:
Mimi's Pie Crust
2 cups unbleached flour
1 cup butter flavored crisco
1tsp. salt
1/2 cup water
Mix flour, shortening and salt with fingers, until it resembles a crumb mixture. Add water. Form dough into a ball, divide into 4 pieces and roll out the crusts.
This makes two 2 crust pies.
Bake all pies on the lowest racks of the oven.
For Blueberry filling:
for a 9 inch pie
1/2 cup sugar or splenda
1/3 flour
1/2 tssp. cinnamon
4 cups blueberries
1 Tbsp. lemon juice
2 Tbsps. butter or margarine, I always use butter
Heat oven to 425 degrees. Prepare pastries. Stir together sugar, flour and cinnamon; mix with berries. Turn into pastry-lined pie pan; sprinkle with lemon juice and dot with butter.
Cover with top crust which has slits cut into it; seal and flute. Cover edge with 2-to3- inch strip of aluminum foil to prevent excessive browning; remove foil last 15 mins. of baking.
Bake pies for 35-45 mins. or until crust is brown and juices begins to bubble through slits in crust.

We had so much fun , I think we will do it again this year!